
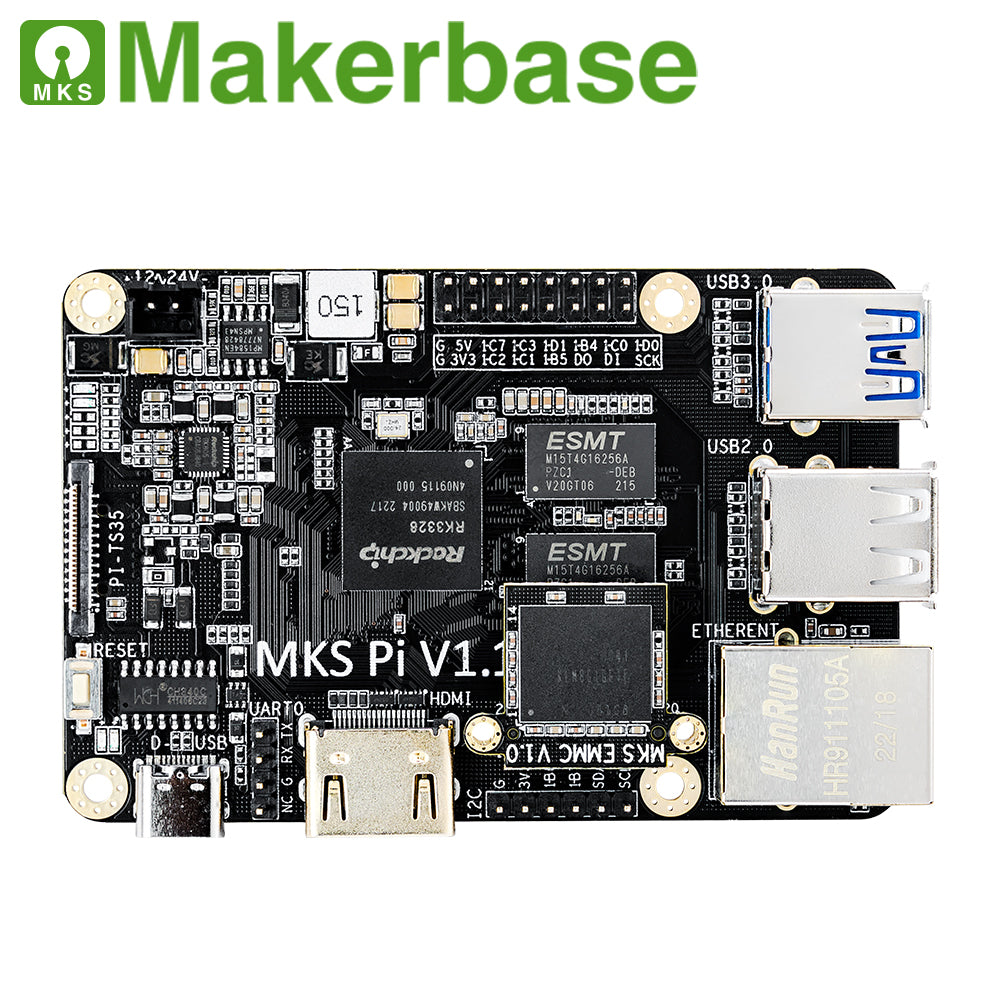
MKS PI V1.1
1. What is MKS Pi for?
As we all know, the Klipper firmware has the advantages of high printing speed, high precision, and the ability to use the web page to control the printer, etc. MKS PI is a high-end microcomputer board designed by makerbase to replace the Raspberry Pi for the convenience of 3D printing users to use the Klipper firmware. The size, mounting holes, and interface locations are compatible with Raspberry Pi 3B. In terms of hardware, MKS PI has a powerful 4-core 64-bit SOC onboard, with 1GBytes of DDR3 memory, supports HDMI screen interface and PI-TS35 screen interface, provides Ethernet port, 3-channel USB interfaces (can be connected to a 3D printer main board, USB Wireless network card, USB camera, U disk, USB keyboard and mouse, etc.);
Regarding software, Makerbase provides a complete Klipper firmware transplanted based on the Armbian desktop system, and directly supports klipperScreen. Users only need to download the image file provided by Makerbase, burn it to the TF card, without much construction work, use the USB or serial port to connect your main board, and configure the parameters on the webpage, and you can use the Klipper firmware happily!
2. Features and advantages
- Onboard powerful 4-core 64-bit core SOC, with 1GBytes of DDR3 memory;
- DC12/24V power supply, more stable power supply;
- Support HDMI screen interface, PI-TS35 screen interface;
- Provide wired Ethernet port, 3-way USB interface (can be connected to 3D printer main control board, USB wireless network card, USB camera, U disk, USB keyboard and mouse, etc.);
- The mounting holes and dimensions of the board are the same as those of the Raspberry Pi, which can be directly replaced by the Raspberry Pi.
3. Download
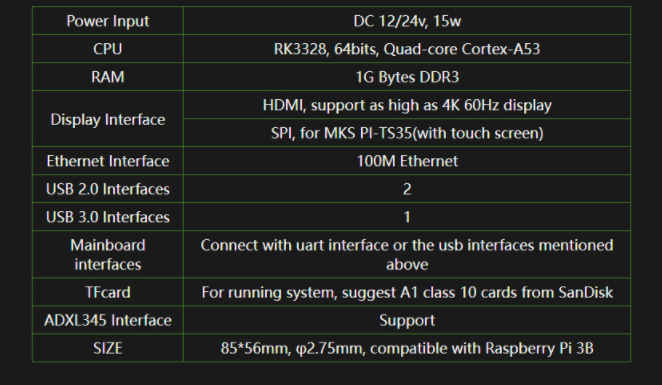
4. Mainboard Parameters
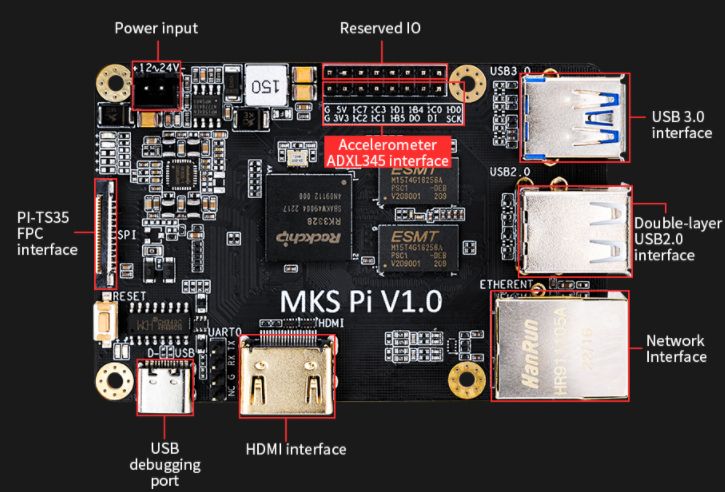
5. Wiring Diogram
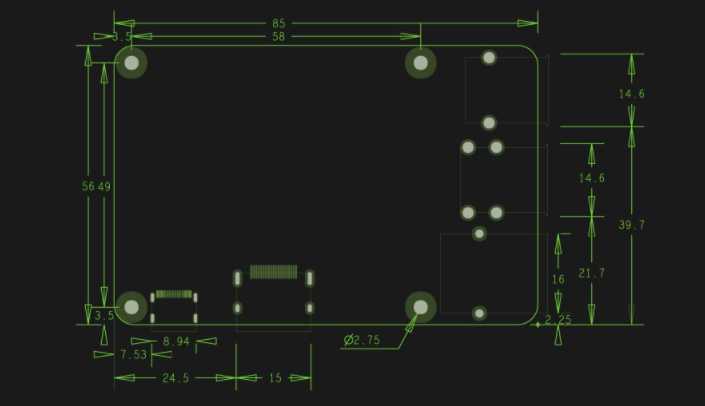
6. Dimensions
7. How to download and install system images?
Makerbase provides a complete Klipper firmware transplanted based on the Armbian desktop system, and directly supports klipperScreen. Users only need to download the image file provided by Makerbase, burn it to the TF card, without a lot of construction work(If you have purchased a package that includes a TF card, the TF card has already been burned into the system before leaving the factory, and you do not need to burn it again unless you want to update a new image.).
7.1 Hardware Preparation
- A TF memory card not less than 8G
- TF card reader
- PC with windows operating system installed
- Wireless network card or network cable
- Type_C cable
7.2 Software preparation
7.3 Flash system files
- Format TF card to FAT32 format before flash system files
- Insert the TF card into the card reader, and insert the card reader into the PC
- Unzip the downloaded image file
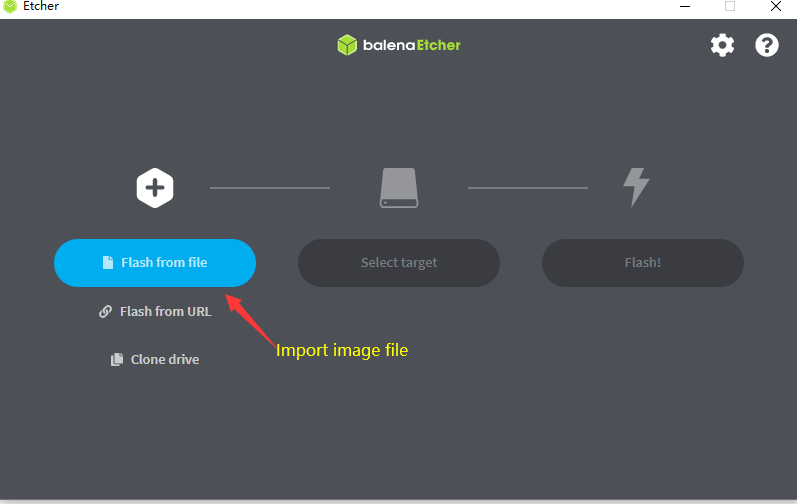
- Run balenaEtcher, import the decompressed image file->Select TF card->Click to start flash
- After the flashing is finish, insert the TF card into the MKS PI and power on with DC12/24V
8. MKS PI network connection
8.1 Using the Ethernet
Just set your router to using DHCP, plug the network cable into the MKS PI, done.
8.2 Using USB WiFi Adapter
MKS PI supports USB WiFi Adapter, but not every type is guaranteed to be available. Now, we the types we have tested available include those based on RTL8188CUS(VID:PID = 0bda:8176)/RTL8188EUS(VID:PID = 0bda:8179)/RTL8188GU(RTL8710B)/(VID:PID = 0x0BDA:0xB711). According to the current testing experience, it is not recommended to use adapters based on RTL8188GU(RTL8710B), it has been supported on MKS PI, but it's driver takes a lot of CPU load(about 27% in our test). Other adapters like the one based on RTL8188CUS/RTL8188EUS have a perfect perfomance. Insert the USB WiFi adapter to one of the 3 usb ports of MKS PI, you have two ways to config it to connect to your router.
8.3 Through the config file on the TF card
- Before power on, insert the TF card to the PC with TF card reader, it would generate two disks on PC
- Open the "Boot" disk, find the config file "wpa_supplicant-wlan0.conf" and open it with text editing software (e.g. notepad, notepad++, etc.)
- Modify the ssid and psk according to your router, save the config file
- Remove the TF card from the PC, and insert it to the MKS PI It would connect to your router automatically.
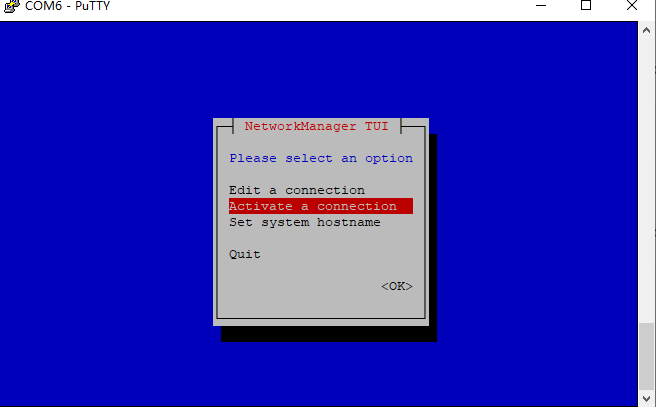
- Through the serial software(we using Putty to describe below)
- Prepare putty according to the steps
- Enter the command “nmtui” to connect to the network.
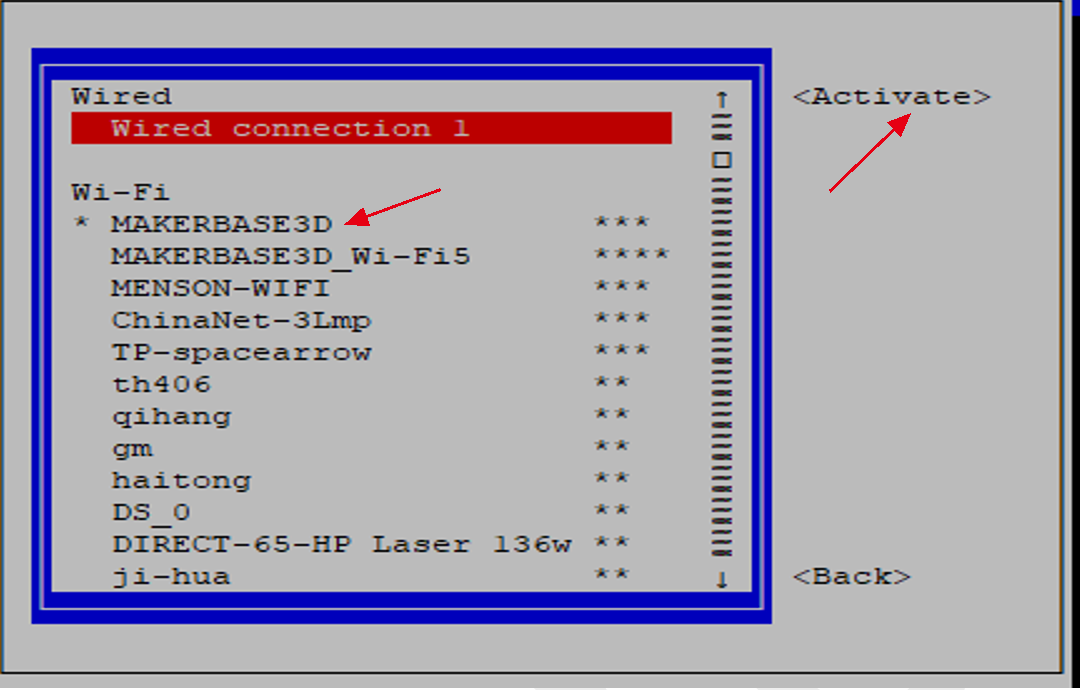
- Select “Activate a connection”, select the wifi and enter the password to connect.
9. Get the IP of MKS PI
After connect MKS PI to the network, you can get its IP address in two ways
9.1 From the Serial software on PC
Enter the command “ip a” and view the IP
9.2 From KlipperScreen
If you have a PI-LCD or HDMI screen connected with MKS PI, it would run KlipperScreen after system boot. You can find your IP address on the "Config"->WiFi
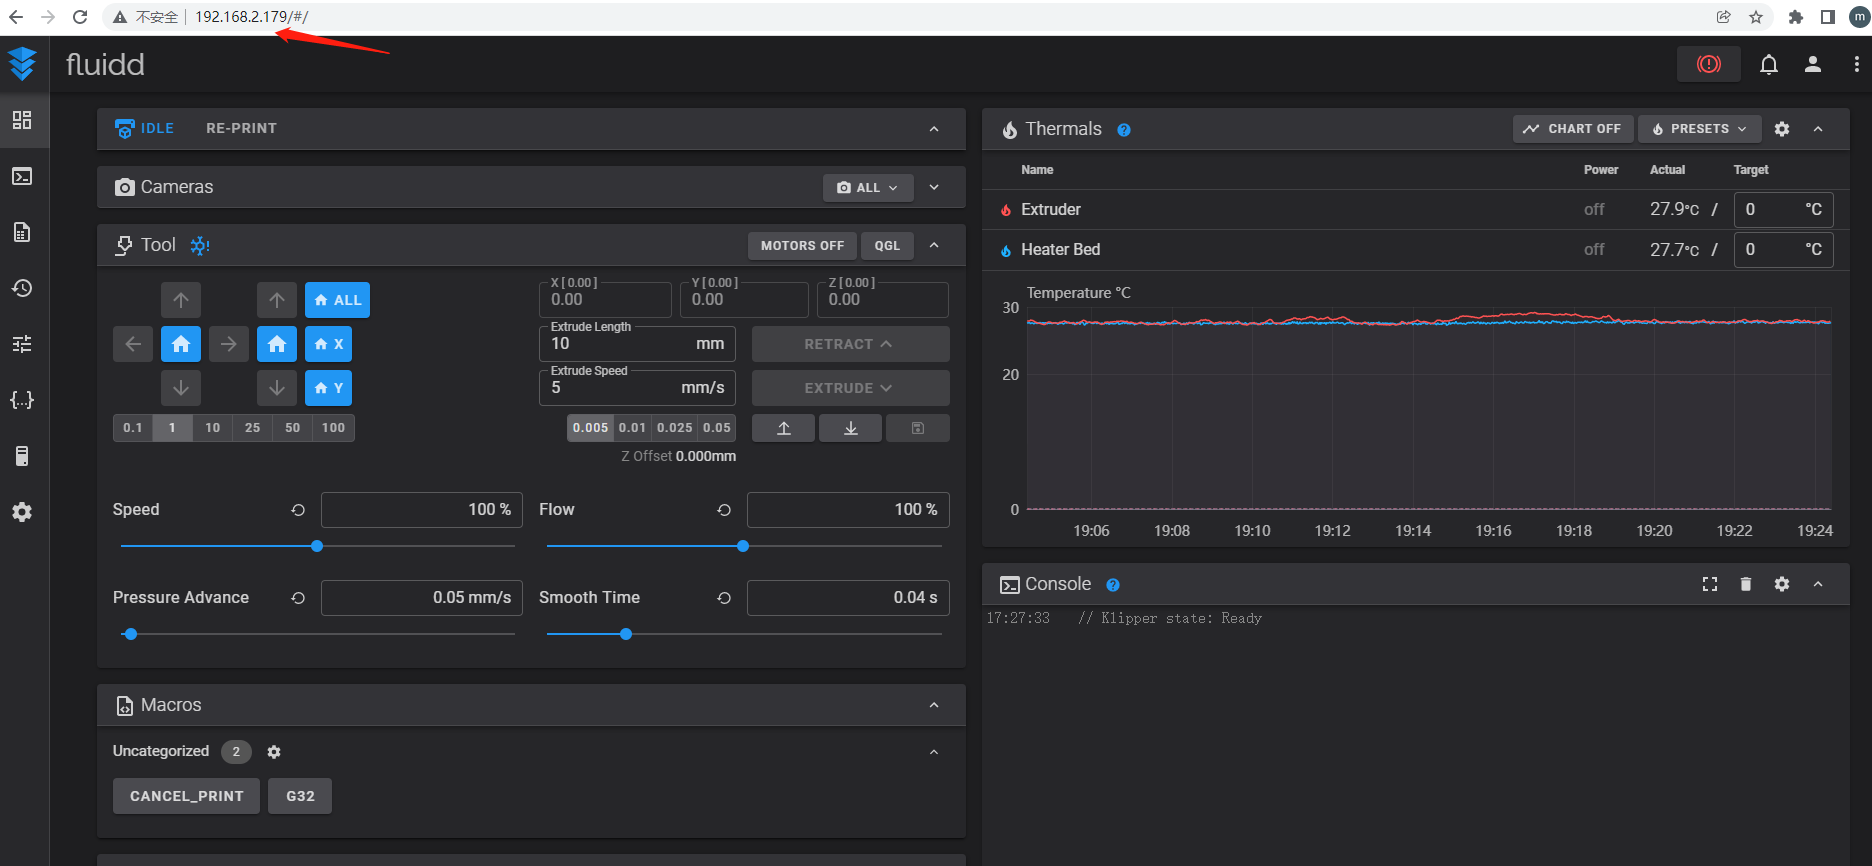
10. Enter Fluidd interface
After connect the MKS PI to the network, you can directly enter the IP address of MKS PI with your PC's browser, and you can enter fluidd interface(Makerbase's image has installed fluidd, of cause you can install other interface).
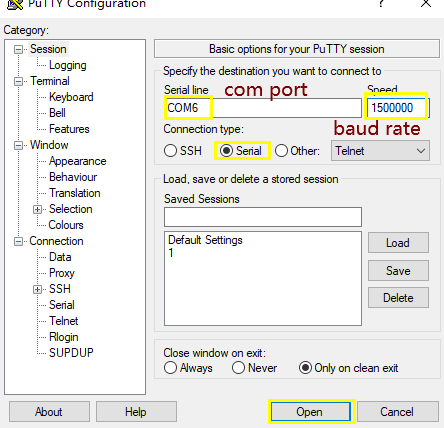
11. MKS PI Using Serial software on PC(we using Putty to describe below)
Using Serial software on PC(we using Putty to describe below)
- Connect the MKS PI with the TYPE-C cable to the PC, supply power to the PI, check the COM port in the device manager of the PC, and then open Putty
- Select the COM port, set the baud rate to 1500000, and click “Open” to connect
-
If you open a black empty window, click the Enter key, and it will ask you to enter the login user and password
- There are two users in the system provided by Makerbase:
root user: root
user2: mks
their origin passwords are the same: makerbase
-
After enter the user and password, you can enter the system now.
12. MKS PI Connection MKS PI with motherboard
You can use 3 USB ports and a uart to connect MKS PI and your motherboard.
12.1 USB connection
Most 3D printing motherboards have a USB port converted from the serial port. Use a usb cable to connect it to one of the three B-type USB ports of the MKS PI.
Find the device name of the USB port, login MKS PI from Putty or other serial software and type:
ls /dev/serial/by-id/*
It will display the name like below(confirm your USB connection is ok):
/dev/serial/by-id/usb-Klipper_stm32f407xx_4D0045001850314335393520-if00
Copy the device name to the "[mcu]" segment on printer.cfg file of Klipper :
[mcu] serial: /dev/serial/by-id/usb-Klipper_stm32f407xx_4D0045001850314335393520-if00
12.2 UART Connection
You can also use the uart0 on MKS PI to connect your motherboard(Make sure your motherboard has the uart pins lead out).
On the printer.cfg file of Klipper, the serial should be /dev/ttyS0:
[mcu] serial:/dev/ttyS0
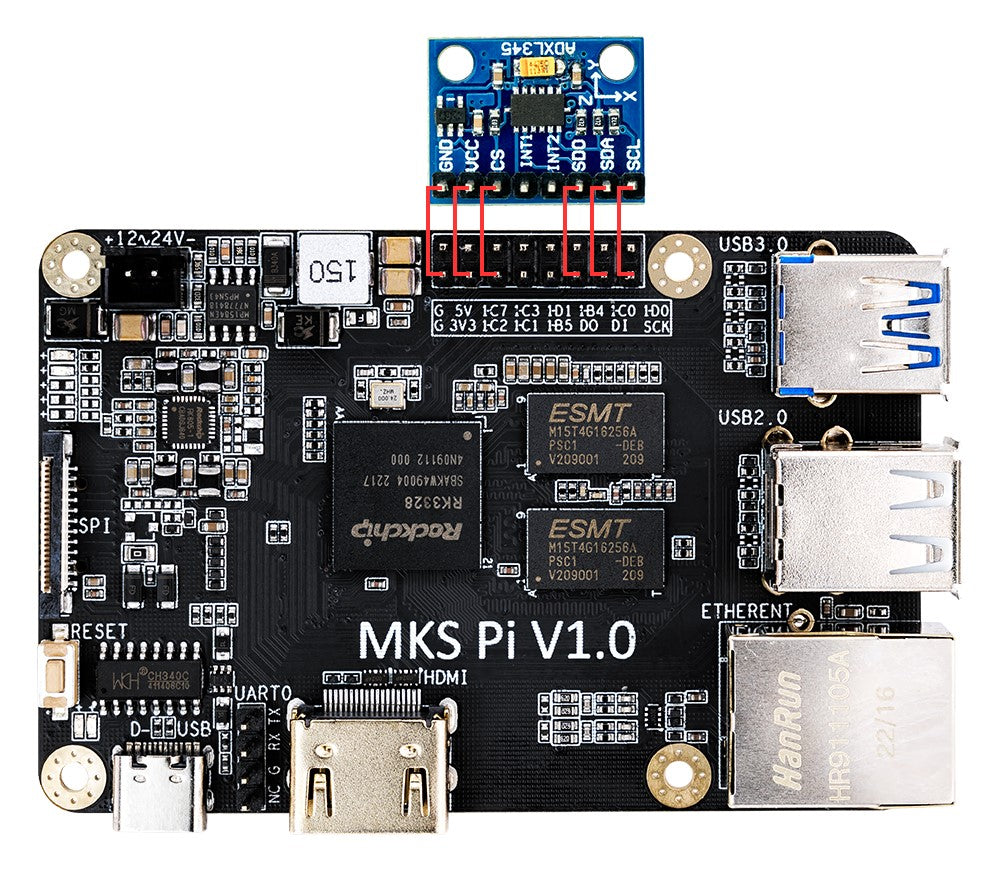
13. MKS PI ADXL345 connection and configuration
If you want to use the ADXL345, it is very easy to connect on MKS PI:
The MKS PI image has the acceleration calculation library and the dependent library installed by default, no additional configuration is required, just configure the ADXL345 and test position parameters in the printer.cfg file.
13.1 Configure adxl345 in the configuration file, copy the following parameters to the printer.cfg file
[mcu rpi] serial: /tmp/klipper_host_mcu
[adxl345] cs_pin: rpi:None spi_bus: spidev0.2
13.2 Save and restart Klipper, and send the query command after the web interface does not report an error:
ACCELEROMETER_QUERY
Now the acceleration sensor data can be received. The data is similar to the following:
Recv: // adxl345 values (x, y, z): 430.619210, 831.432400, 8718.156800...
13.3 Configure the test position of adxl345, generally installed in the middle of the platform
[resonance_tester] accel_chip: adxl345 probe_points:
115, 115, 20 # an example
13.4 Test acceleration and configure input_shaper data
Before the test, first increase the acceleration configuration of the printer (you can change it to a smaller value after the test):
[printer] max_accel: 7000 max_accel_to_decel: 7000
13.5 If there is an input_shaper function parameter in the configuration file, you need to send an instruction to turn it off:
SET_INPUT_SHAPER SHAPER_FREQ_X=0 SHAPER_FREQ_Y=0
13.6 Then send the auto test configuration command to start testing the vibration:
SHAPER_CALIBRATE
13.7 After the test, it will return the recommended configuration method and configuration value of the x-axis and y-axis, configure the value in the configuration file, then save and restart, the configuration is similar to the following:
[input_shaper] shaper_type_x = 3hump_ei shaper_freq_x = 52.4 shaper_type_y = 2hump_ei shaper_freq_y = 37.5
14. USB camera connection and configuration
The default image of MKS PI has already installed MJPG-Streamer and enable the USB camera. MKS PI supports most of the commonly used USB cameras(but not guaranteed). Normally, just connect your USB camera to one of B-Type USB port on MKS PI, you will see the preview video on the Fluidd interface.
If you don't want to use the USB camera, you had better to disable it to reduce CPU load:
Enter the setting item on the Fluidd interface -> camera -> default -> disable
15. How to modify the device tree file?
Maybe someone likes to make some customized configuration on the device tree file,
- SSH to log in to the PI shell
- Backup the /boot/dtb/rockchip/rk3328-roc-cc.dtb file, for example:
sudo cp /boot/dtb/rockchip/rk3328-roc-cc.dtb /boot/dtb/rockchip/rk3328-roc-cc.dtb.bak
- Decompile the dtc file to dts file:
sudo dtc -I dtb -O dts -o rk3328-roc-cc.dts /boot/dtb/rockchip/rk3328-roc-cc.dtb
- Modify the dts file just generated as you want, for example, change the rotation of the lcd...
- Compile the dts file to overlay the origin one
dtc -I dts -O dtb -o rk3328-roc-cc.dtb /boot/dtb/rockchip/rk3328-roc-cc.dts
- Reboot the system
16. How to rotate 180° for the TS35 display?
Should change the dts file of rk3328-roc-cc.dtb, we have made one here, you can download it, and then:
- SSH to login to the PI shell
- Copy the downloaded rk3328-roc-cc.dtb to the direction of "/boot/dtb/rockchip" on MKS PI using software like WinSCP
- Reboot the system
17. Use with the tool header modules
Support using MKS PI with the tool header modules like MKS THR36/42, more details >>>
MKS SKIPR V1.0
|
Thumbnail Preview |
MCU |
Stepper Interface |
Stepper Driver |
Heater& Temperature Interface |
Fans |
 |
STM32F407VET6 Architechture: 32-bit Frequency:168MHz RAM: 192KB |
8 axis driver 9 motor interface (2 z-axis share 1 driver) |
No on-baord stepper driver (buy seperately) Supported Mode: UART mode SPI mode |
4 heater: 1 heated bed 3 hotend 4 temperature interface: 1 heated bed 3 hotend |
Controllable Fan: 3 Always-on Fan: 3 |
|
|
End-stops |
LCD Interface |
Connection |
Supported Firmware |
Features |
| learn more>> | 4 |
Supported LCD: MKS TS35 MKS H43 MKS MINI12864 V3 LCD12864 LCD2004 |
|
Klipper |
MKS DLC V2.1
|
Thumbnail Preview |
MCU |
Stepper Interface |
Stepper Driver |
Heater& Temperature Interface |
Fans |
 |
ATMEGA328P-AU Architechture: 8-bit Frequency:20MHz RAM: 2KB |
3 axis driver |
No on-baord stepper driver (buy seperately) | NA | NA |
|
|
End-stops |
LCD Interface |
Connection |
Supported Firmware |
Features |
| learn more>> | 3 | NA |
|
GRBL |
MKS DLC 32 V2.0
|
Thumbnail Preview |
MCU |
Stepper Interface |
Stepper Driver |
Heater& Temperature Interface |
Fans |
 |
ESP32-WROOM-32U Frequency:80-240MHz RAM: 520KB |
3 axis driver |
No on-baord stepper driver (buy seperately) Supported Mode: SPI mode |
NA | Always-on Fan |
|
|
End-stops |
LCD Interface |
Connection |
Supported Firmware |
Features |
| learn more>> | 3 |
Supported LCD: MKS TS24-R |
|
GRBL |
MKS Monster8 V2.0
|
Thumbnail Preview |
MCU |
Stepper Interface |
Stepper Driver |
Heater& Temperature Interface |
Fans |
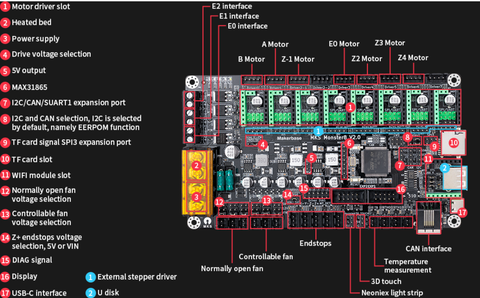 |
STM32F407VET6 Architechture: 32-bit Frequency:168MHz RAM: 192KB |
8 axis driver 9 motor interface (2 z-axis share 1 driver) |
No on-baord stepper driver (buy seperately) Supported Mode: STEP/DIR mode UART mode SPI mode |
4 heater: 1 heated bed 3 hotend 4 temperature interface: 1 heated bed 3 hotend |
Controllable Fan: 3 Always-on Fan: 3 |
|
|
End-stops |
LCD Interface |
Connection |
Supported Firmware |
Features |
| learn more>> | 5 |
Supported LCD: MKS TS35 MKS mini 12864 v3 LCD 12864/2004 |
TF Card WiFi module slot USB-C interface U disk |
Marlin 2.0.x Klipper |
1.12C/SPI/SUART1 expansion ports 2.Boot0 button set 3.Built-in CAN transeivcer 4.EEPROM 4KB integrated 5.3D-Touch port ... |
MKS Robin E3D V1.1
|
Thumbnail Preview |
MCU |
Stepper Interface |
Stepper Driver |
Heater& Temperature Interface |
Fans |
 |
STM32F103RCT6 Architechture: 32-bit Frequency:72MHz RAM: 48KB |
4 axis driver 5 motor interface (2 z-axis share 1 driver) |
No on-baord stepper driver (buy seperately) Supported Mode: UART mode SPI mode |
2 heater: 1 heated bed 1 hotend 2 temperature interface: 1 heated bed 1 hotend |
Controllable Fan: 1 Always-on Fan: 2 |
|
|
End-stops |
LCD Interface |
Connection |
Supported Firmware |
Features |
| learn more>> | 3 |
Supported LCD: LCD12864 LCD2004 |
|
Marlin 2.0.x, Klipper |
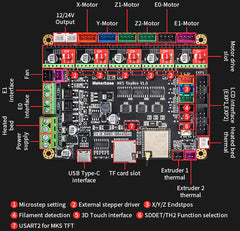
MKS Robin Nano V3.1
MKS TinyBee V1.0
|
Thumbnail Preview |
MCU |
Stepper Interface |
Stepper Driver |
Heater& Temperature Interface |
Fans |
 |
ESP32-WROOM-32U Frequency:80-240MHz RAM: 520KB |
5 axis driver+5 external stepper driver 6 motor interface (2 z-axis share 1 driver) |
5 axis driver 6 motor interface (2 z-axis share 1 driver) |
3 heater: 1 heated bed 2 hotend 3 temperature interface: 1 heated bed 2 hotend |
Controllable Fan: 2 Always-on Fan: 2 |
|
|
End-stops |
LCD Interface |
Connection |
Supported Firmware |
Features |
| learn more>> | 3 |
Supported LCD: LCD12864 LCD2004 |
|
Marlin 2.0.x |
MKS Eagle V1.0
|
Thumbnail Preview |
MCU |
Stepper Interface |
Stepper Driver |
Heater& Temperature Interface |
Fans |
 |
STM32F407VET6 Architechture: 32-bit Frequency:168MHz RAM: 192KB |
5 axis driver 6 motor interface (2 z-axis share 1 driver) |
No on-baord stepper driver (buy seperately) Supported Mode: UART mode SPI mode |
3 heater: 1 heated bed 2 hotend 3 temperature interface: 1 heated bed 2 hotend |
Controllable Fan: 2 Always-on Fan: 2 |
|
|
End-stops |
LCD Interface |
Connection |
Supported Firmware |
Features |
| learn more>> | 4 |
Supported LCD: MKS H43 MKS MINI12864 V3 LCD12864 LCD2004 |
|
Marlin 2.0.x, Klipper, Reprap |
Blog posts
-

How to Choose Your Board? - 1
This is an elementary guide for 3D printer owners to choose a board properly to your need. We sorted some fundamental information in this first part to help you have...
How to Choose Your Board? - 1
This is an elementary guide for 3D printer owners to choose a board properly to your need. We sorted some fundamental information in this first part to help you have...
-

How to use Octoprint with MKS PI/SKIPR?
Download the software for communication between the motherboard and the computer:https://www.xshell.com/zh/free-for-home-school/*After filling in the Name and Email Address, check "Xshell only", and click Download. Check your email. Find the official...
How to use Octoprint with MKS PI/SKIPR?
Download the software for communication between the motherboard and the computer:https://www.xshell.com/zh/free-for-home-school/*After filling in the Name and Email Address, check "Xshell only", and click Download. Check your email. Find the official...

